Monday, 5 December 2016

Pinholes in Scotland

Did a day trip to Scotland whilst I was on holiday in the Lake District.

IMG_1803

The 8x10 setup on a tidal loch. There was no where to place the tent pegs, so I had to tie the guy ropes around rocks. There was no wind, so hopefully there will be no blur.

IMG_1800

The 8x10 has an effective aperture of f/400. This gives an exposure time of 10s.

IMG_1801

I should really add the exposure compensation in the reciprocity app (and I should take the screen shot before the timer counts down too). I metered at ISO 50 which is why there’s no compensation showing. The adjusted exposure for reciprocity is 33s.

IMG_1810

Next I move on to the 4x5 camera. I wanted to get a similar photo to the one from the 8x10 so I can get a feel for the sharpness, field of view, etc between the two cameras.

IMG_1806

The 4x5 has an effective aperture of f/200. This gives an exposure time of 5s.

IMG_1807

Again, I metered at ISO 50 instead of ISO 100, so the meter reading already has +1 stop of exposure compensation. Taking reciprocity into account gives 11s of exposure.

Thursday, 1 December 2016

Making a Wooden Box for my 4x5 Film

I wanted a small wooden box to hold two packs of Shanghai Pan 100 sheet film. I had some nice beech hardwood that I could use.
IMG_1720
Using the ‘shooting board’ and plane to make the ends square. I planned to use use butt joints for this as I am about to go on holiday and I want to take the finished box with me.
IMG_1723
Quick glue up using a box clamp.
IMG_1725
Some boards I had previously glued up for a different project that went nowhere. These would be the top and bottom of the box.
IMG_1726
The boards glued on the top and bottom and a heavy weight added. In the future I will use clamps, as this didn’t work so well. Sad smile
IMG_1742
Closed box with oversized edges. Next to trim down the edges, then cut the box open.
IMG_1747
I used a little wooden block plane to trim the boards down to size, along with a sander when close.
IMG_1751
Looking good so far. Smile
IMG_1753
Carefully cutting the box open by hand.
IMG_1754
Success!
IMG_1756
Gluing little pieces in to held keep the lid in the right place as the box closes. This will also help the clasp align.
IMG_1757
The clasp I plan to use.
IMG_1766
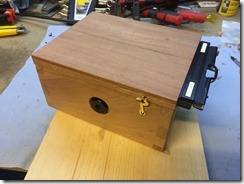
Hinges and clasp fitted.
IMG_1767
The shut line is a little uneven Sad smile
IMG_1769
But the two boxes of film fit like a charm Smile
IMG_1776
I adjusted the hinges a bit to get a better shut line, then gave it a nice coat of bee’s wax furniture polish. Job done.

Thursday, 24 November 2016

Pinhole Camera – 4x5, 60mm – Test Image

After the paint had dried on the inside, I took the camera out for a test.
IMG_1699
The 0.3mm pinhole has an effective aperture of f/200 for the 60mm focal length. This gives an exposure of 10s with +1 stop for reciprocity failure compensation.
IMG_1700
Which I timed on my phone.
IMG_1702
And then used the ‘Massive Dev Chart’ app to help with the development (awesome app, you should get it). I processed the 4x5 sheet film (Shanghai Pan 100, aka ‘GP3’) in Rodinal at 1:49 dilution.
IMG_2039
I normally print my negatives, so wasn’t setup to take a scan (photo) of a 4x5 negative. I placed the negative on my tablet computer. This resulted in a bit of a weird image (as you can see the pixels) but was good enough for a test.
IMG_2039
With the image inverted in GIMP. The grey area on the left is an inverted white reflection of my ceiling. Good enough for a test. Looks like I needed to add more reciprocity failure compensation.

Sunday, 20 November 2016

Pinhole Camera – 4x5, 90mm (Build Part 2)


Minor update on the 90mm focal length pinhole camera. I sealed the joins with black silicone, then painted the inside with matt black chalk board paint. I made sure to cover the shiny brass bolt in lots of paint so it doesn’t reflect.
IMG_1687

Saturday, 19 November 2016

Pinhole Camera – 4x5, 60mm (Build Part 1)

This is the second pin hole camera I started to make, and the first I have finished. The last camera was made out of Oak and used butt joints, this one is made out of Mahogany and uses dove tail joints.
IMG_1479
Cutting the tails and pins.
IMG_1482
A closer look… these were my first dove tail joints and whilst ok they weren’t as good as I’d hoped.
IMG_1483
Test fit. They fit together fine, but not as close as I’d have liked.
IMG_1486
I’d previously created a wider board by joining two pieces of stock together. In this case a cut the second piece in half, so I joined a half on either side of the first piece. I did this so I wouldn’t have to drill a hole for the pinhole on the join. I really wanted to see how the wood would look with a finish, so added some bee’s wax.
IMG_1637
I glued up two more pieces of stock for the back, this time I didn’t need to worry about the join being in the middle.
IMG_1639
I added a border for the film holder to fit into, and also cut a channel for the notch on the film holder to fit into.
IMG_1640
I cut a notch out of the side of the camera to let the film holder sit inside the box slightly so that the edge didn’t line up with the light seal. I added a lip all round the inside of the camera for the film holder to sit on.
IMG_1644
Test fit of the film holder. Once it fit correctly, I could add the hinges to allow the back to open to accept the film holder.
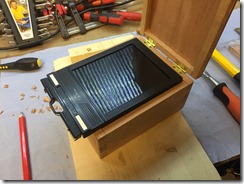
IMG_1645
Hinges added. I used brass ones and made sure to recess them.
IMG_1651
The film holder fits in quite snug.
IMG_1652
I still need to add some felt to act as a light trap. This will also give some spring for the catches to work with.
IMG_1657
Next I drilled a hole for the vertical spirit level.
IMG_1658
And same again for the horizontal one.
IMG_1662
Next I did the same for the tripod mounts.
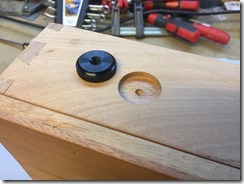
IMG_1664
And again…
IMG_1667
With the tripod mounts and the spirit levels epoxied in, I added the catches.
IMG_1668
And drilled the hole for the pin hole to be installed. The pin hole will be glued on the inside, but I need to make sure that the outside won’t vignette as the wood is quite thick here, hence the step cuts.
IMG_1673
I added opaque sealant (black silicone) to the seams and a felt light trap. This also adds some pressure to the catches (which I had notched anyway to stop them flying open).
IMG_1674
Building the shutter, here you can see the holes for the magnets, and the magnets themselves.
IMG_1675
Holes drilled in the camera body ready for the magnets.
IMG_1676
I used the same black silicone sealant to glue the pin hole into the camera, then painted the inside of the camera with chalk board paint.
IMG_1678
Next was some furniture polish.
IMG_1685
All ready to go! Smile